Blog

Small House Modern Kitchen Tiles Design: Why Tile Size Decides More Than Style

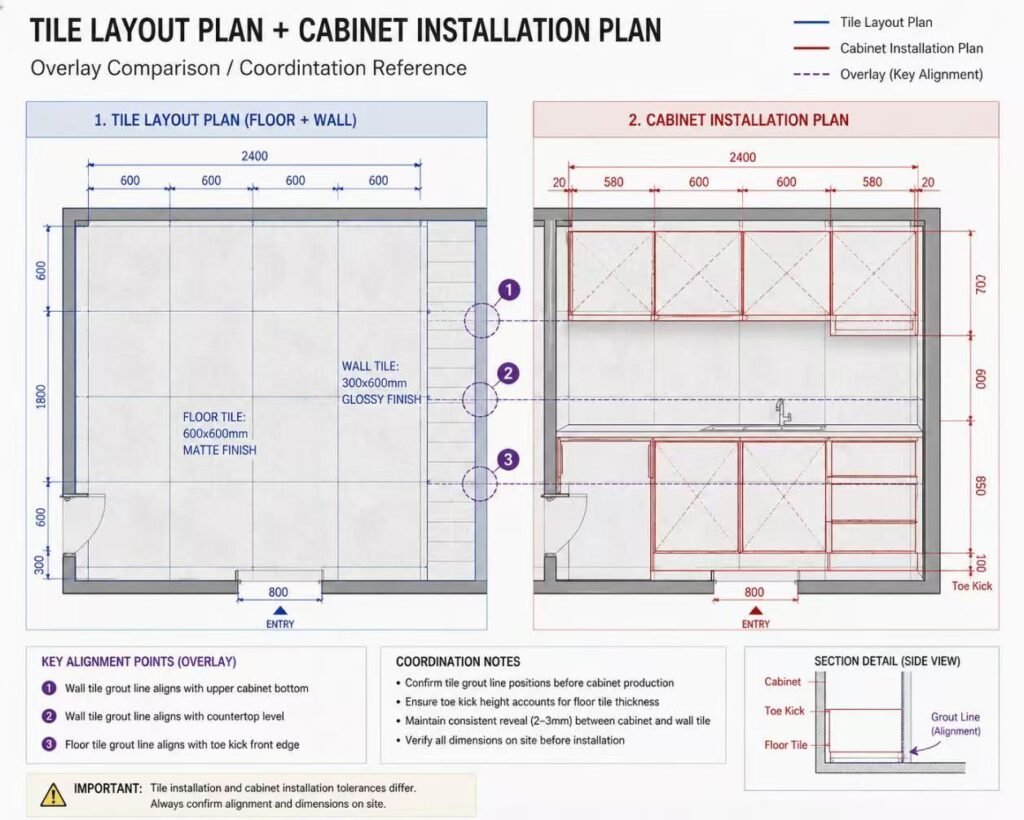
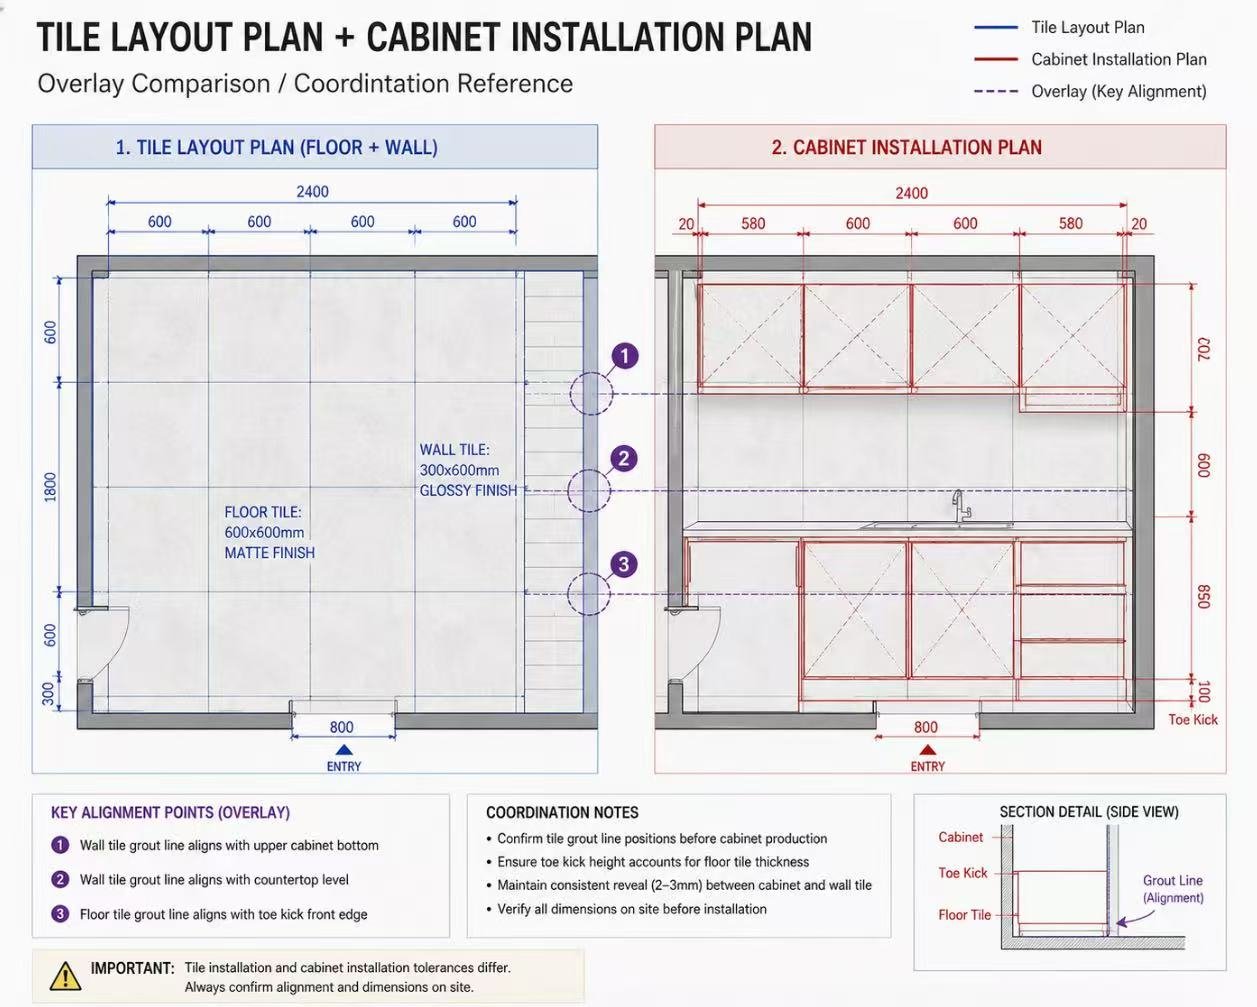
Tile layout coordinated with cabinet installation plan

In the pursuit of personalized spaces and premium living, mass-produced furniture often falls short of capturing the true essence of a home.

As modern minimalism and light luxury styles continue to dominate global design trends, high-end custom furniture has become the absolute core of creating an ideal living space.However, the custom furniture market can be highly complex.

Bridging the gap between a stunning design blueprint and the final product involves navigating materials, hardware, and craftsmanship. Here is how to choose bespoke luxury furniture like a professional designer.

The tile looked perfect in the showroom. Then the cabinets went in, the grout lines didn't line up with the toe-kick, and the backsplash needed an awkward cut behind the hob. Almost every small kitchen tile guide skips straight past this — the size and layout decision matters more than the color once cabinetry enters the picture.

Search "small house modern kitchen tiles design" and you'll find dozens of lists praising large-format tiles, glossy finishes, and light colors for making a compact kitchen feel bigger. All true, and all incomplete — because none of it tells you what happens when that tile layout meets the actual cabinetry going in on top of it. This guide covers both halves of the decision.

Read time — 10 min
Covers — Tile sizing · Climate performance · Cabinet coordination
Scope — Compact kitchens

The Modular Trap: Why Tile Size Isn't Just an Aesthetic Choice

Most small kitchen tile advice treats size purely as a visual lever — bigger tiles, fewer grout lines, a more spacious feel. That's accurate, but it's only half the story. Tile size is also a modular dimension that everything else in the kitchen — toe-kick height, backsplash coverage, cabinet-to-wall junctions — gets built against. Choosing a tile format without checking it against the planned cabinet layout is how a beautiful tile job ends up with an awkward sliver cut behind the last cabinet run, or a grout line landing exactly where a wall cabinet's bottom edge sits.
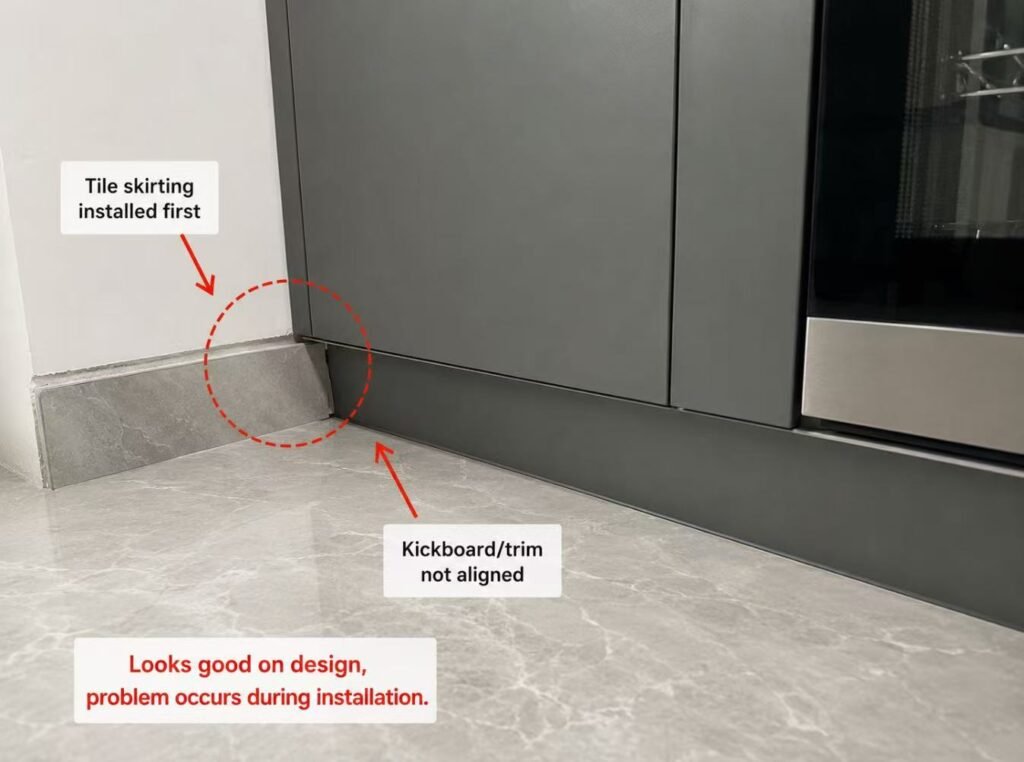
Tile grout line cabinet toe-kick misalignment

Common Tile Sizes for Small Kitchens, and What They Mean for Cabinet Fit

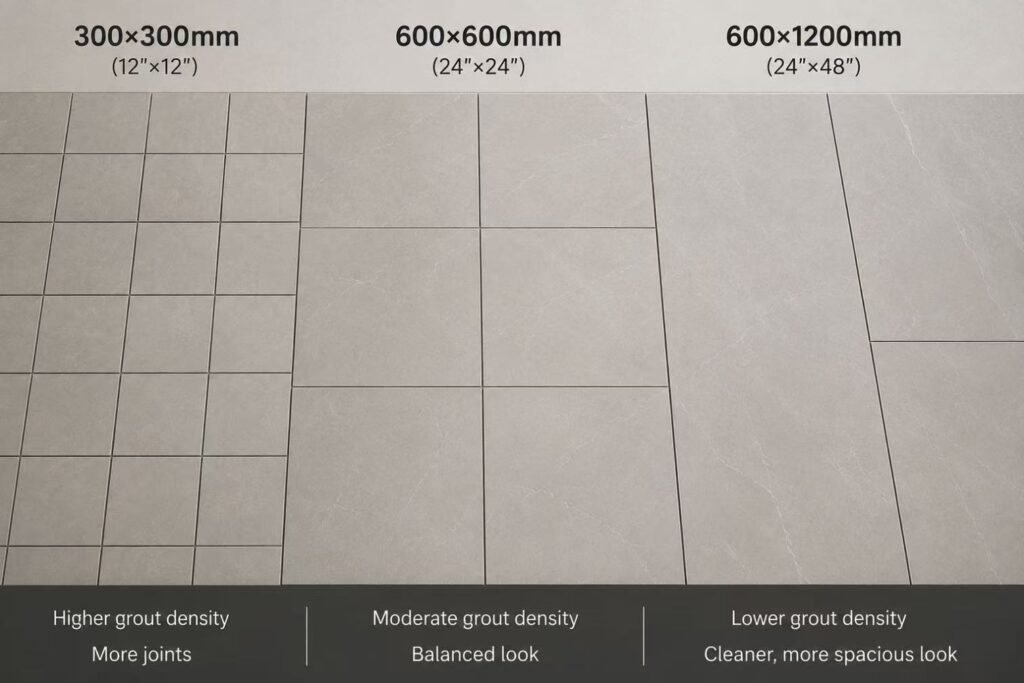
300mm 600mm 1200mm kitchen tile sizes compared
Common small-kitchen tile formats and installation implications
Tile sizeVisual effectCabinet coordination note
300×300mmMore grout lines, busier lookFlexible — easiest to cut cleanly around cabinet returns and toe-kicks
600×600mmCommon “spacious” choice, moderate grout linesPlan cabinet runs in multiples of 600mm where possible to avoid narrow offcuts
600×1200mm+ (large format)Fewest grout lines, most spacious feelRequires the most careful upfront layout — large tiles cut poorly around tight cabinet returns and backsplash niches

The general rule flips for larger tiles: the bigger the format, the less forgiving it is of a cabinet layout that wasn’t planned around it. A large-format tile cut down to a narrow strip behind a single cabinet looks far more obviously wrong than the same cut in a smaller tile.

Popular Styles by Kitchen Type

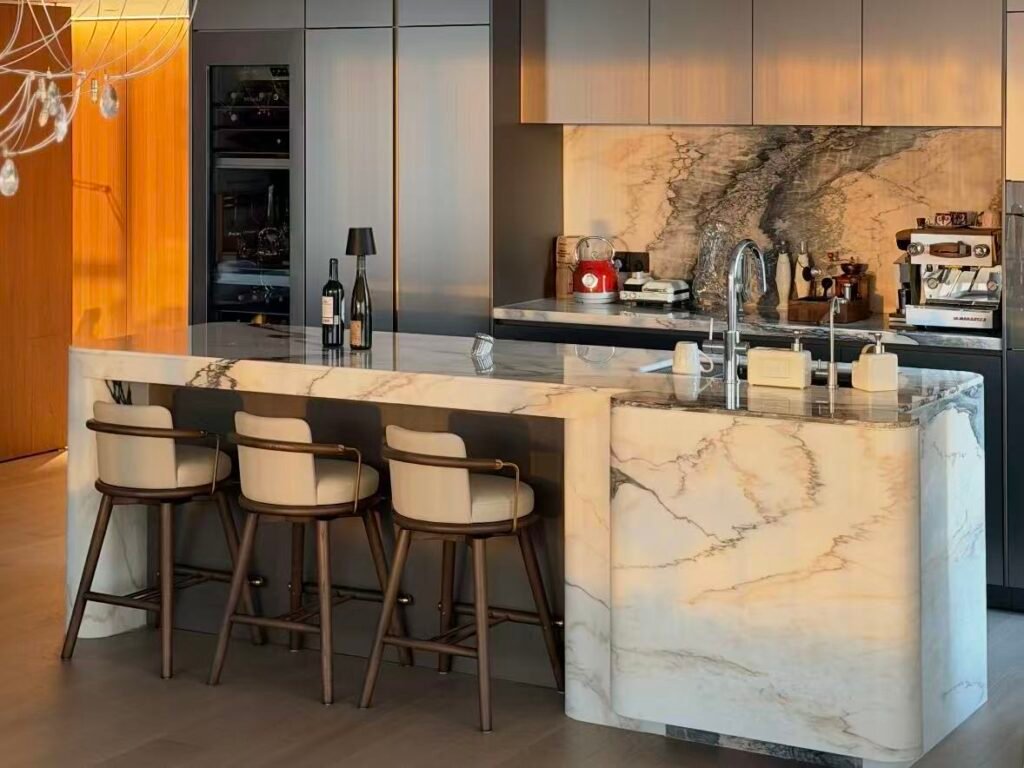
Marble waterfall edge kitchen island design
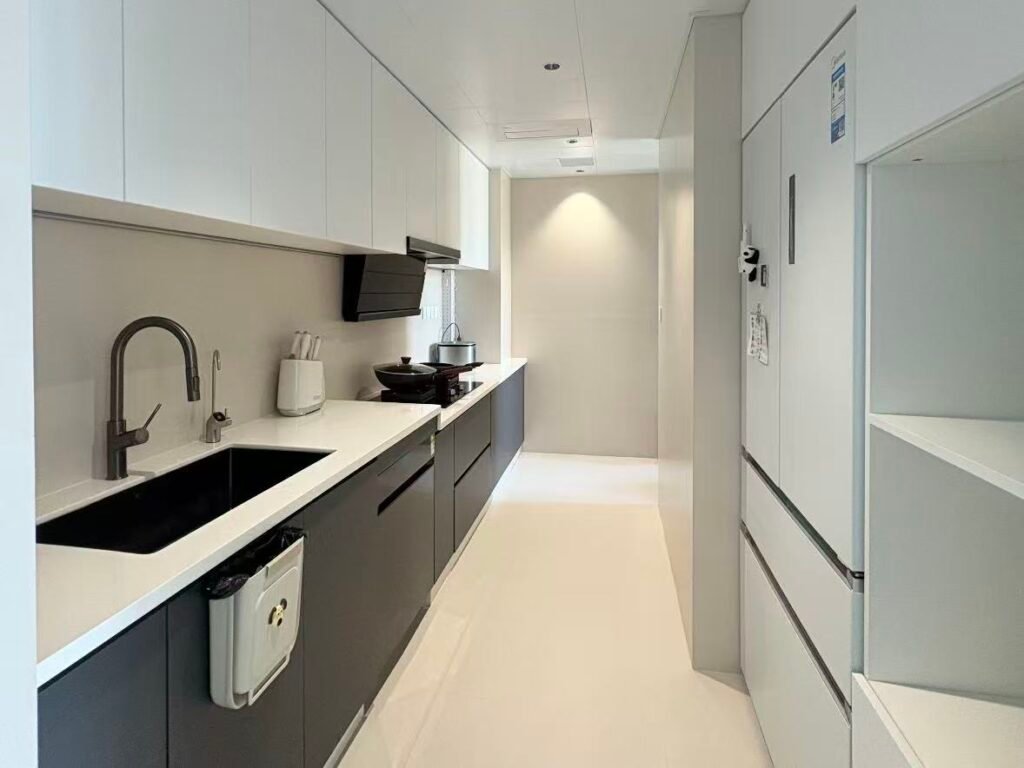
Galley kitchen cabinets with parallel layout
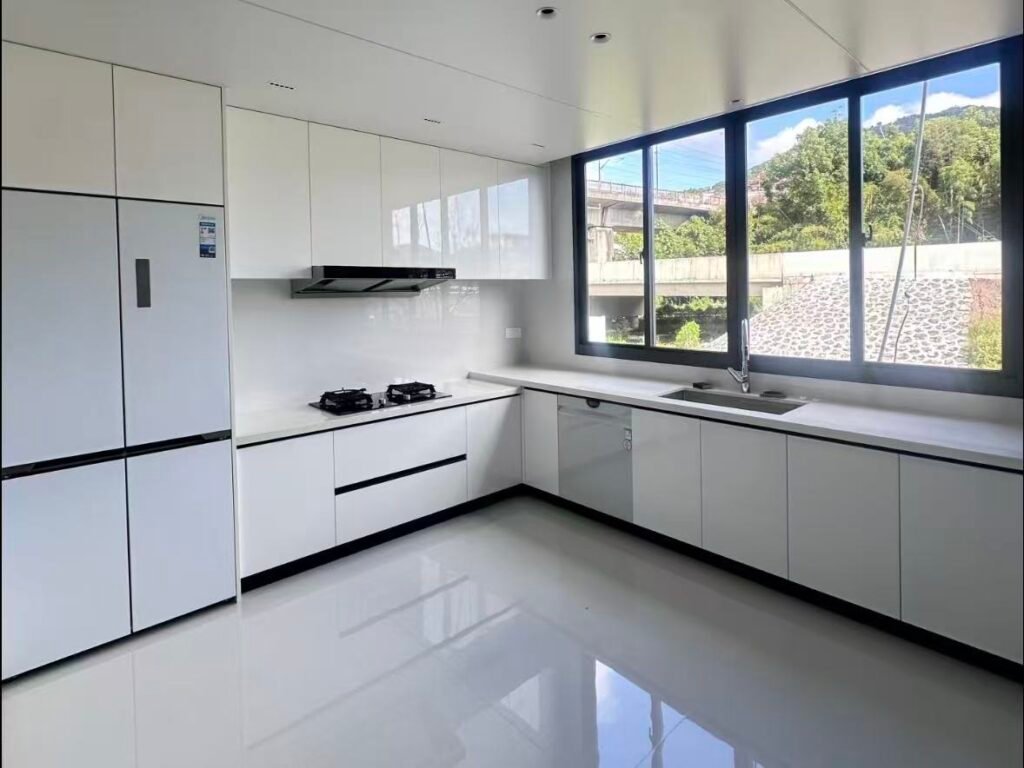
L-shaped kitchen cabinets with corner storage
  • Open-plan small kitchens — light, large-format tiles that visually continue into the adjoining living space, with wood-effect or hydraulic-pattern accents at a breakfast bar to define the zone without a physical wall.
  • Single-wall (galley) kitchens — horizontal-format or large tiles reinforce a sense of length rather than narrowness; busy patterns are best kept to a single accent wall rather than the whole run.
  • L-shaped small kitchens — neutral tile on the main walls, with a contrasting or patterned tile reserved for the section behind the hob or a bar counter, so the corner reads as organized rather than visually split.

Color & Finish: What Actually Matters Beyond "Makes It Look Bigger"

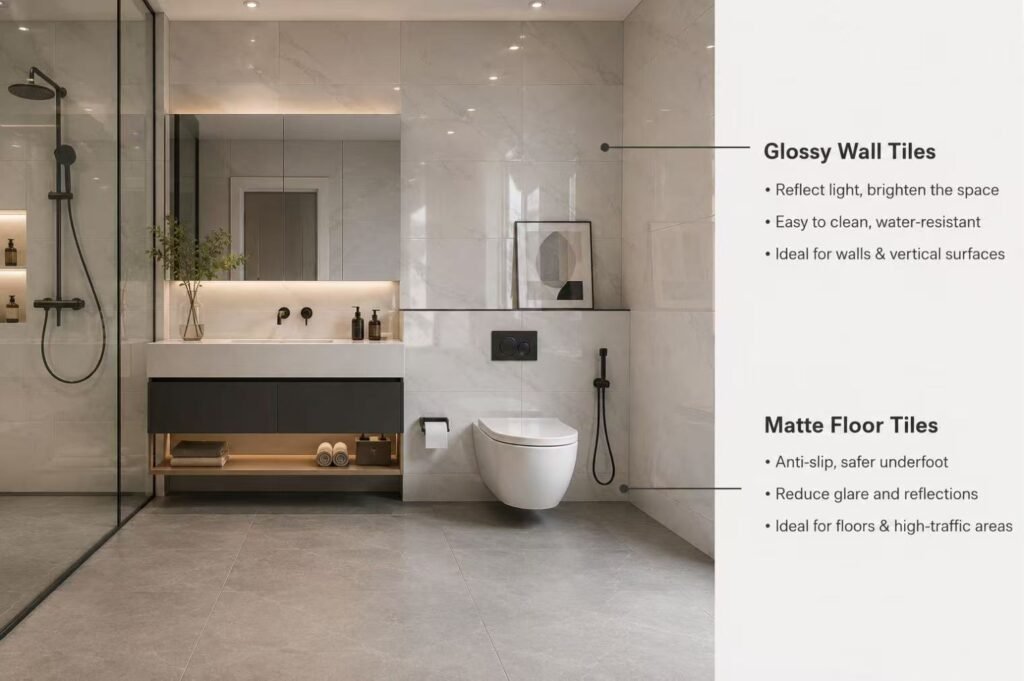
Matte floor glossy wall tile kitchen combination

Light colors and glossy finishes reflect more light and do genuinely help a small kitchen feel larger — that part of the common advice holds up. What’s worth adding: glossy floor tiles, while excellent on walls and backsplashes, introduce a real slip risk on kitchen floors specifically, where water, oil splashes, and steam condensation are routine. A matte or textured finish on the floor, paired with a glossy or satin finish on walls, gets the light-reflecting benefit without the added floor safety trade-off.

Climate Reality: Thermal Shock and Stain Resistance in Tropical & Hot-Dry Kitchens

Tile material is classified by water absorption rate, and this classification is a genuinely useful, testable way to choose the right tile for a hot or humid kitchen rather than relying on marketing language alone:

Tile water absorption classification
ClassificationWater absorptionSuitability
Non-vitreous> 7.0%Not recommended for kitchens in humid or hot climates
Semi-vitreous3.0–7.0%Marginal — better suited to low-moisture areas
Vitreous0.5–3.0%Acceptable for most kitchen applications
Impervious (porcelain)≤ 0.5%Best choice for hot, humid, or high-stain-risk kitchens

Porcelain tiles rated to this impervious standard also tend to perform best against thermal shock — repeated rapid temperature swings between a hot pan set near the tile and a cool splash of water — a test commonly evaluated under EN ISO 10545-9. This matters differently by region:

  • Southeast Asia (humid) — low water absorption reduces the risk of the tile body itself retaining moisture and supporting mold growth at grout lines over time.
  • Middle East (hot, high sun exposure) — thermal shock resistance matters more where a kitchen faces direct sun and rapid surface temperature changes near cooking equipment.

Coordinating Tile Layout With Cabinet Installation: The Step Everyone Skips

This is the step almost no tile-focused content addresses, because it sits at the boundary between two different trades:

Tile layout coordinated with cabinet installation plan
  1. Confirm the cabinet layout before tiling begins — cabinet positions, widths, and the toe-kick height should be finalized and shared with the tiler, not decided after the floor is already laid.
  2. Decide whether backsplash tile extends behind the upper cabinets — tiling only the exposed section (rather than full wall height) saves material but requires precise alignment with where the wall cabinet’s bottom edge will actually sit.
  3. Plan grout lines around fixed points — the sink centerline and the hob position are usually worth centering the tile layout on, rather than starting from an arbitrary wall edge and letting the pattern fall where it may.
  4. Account for cabinet depth when tiling floors — floor tile under cabinet toe-kicks is sometimes skipped to save cost, which is reasonable, but only if the cabinet installer confirms the exact finished floor height in advance so the toe-kick height still comes out correct.

Why this step gets skipped — tiling and cabinetry are usually quoted and scheduled as separate trades, and neither one is automatically responsible for checking the other’s dimensions. Confirming this coordination explicitly — ideally in the same set of drawings — is a simple step that prevents the most common small-kitchen installation mismatch.

Getting Tile and Cabinetry Specs to Actually Match

At BoyceCasa, kitchen cabinet dimensions are confirmed against the actual finished floor and tile layout before production — toe-kick height, backsplash coverage, and cabinet-to-wall junctions planned together rather than adjusted on site after tiling is complete. This same coordination-first approach applies across our kitchen cabinets, wardrobe, and interior doors lines.

Planning a small kitchen renovation? Confirm your tile format and cabinet layout together before either trade starts work — it’s the step that prevents most on-site fitting problems.


FAQS

What tile size is best for a small kitchen?

600×600mm is a common choice that balances a spacious look with manageable installation, though larger formats (600×1200mm or more) create fewer grout lines and an even more spacious feel, provided the cabinet layout is planned around the tile module in advance.

Not for floors specifically. Glossy tiles reflect more light and help a room feel larger, but on kitchen floors they introduce a real slip risk given routine water, oil, and steam exposure. A matte or textured floor finish paired with a glossier wall finish is a safer combination.

Not necessarily, but they should be planned together. A neutral tile with a defined accent zone (such as behind a hob or bar) tends to hold up better over time than a tile chosen in isolation from the cabinetry design.

Porcelain tile rated to an impervious water absorption classification (0.5% or lower) is generally the best choice, offering both moisture resistance in humid climates and better thermal shock resistance in hot, high-sun-exposure kitchens.

Yes. Tile format determines where grout lines and cut edges fall, which should be planned against the cabinet layout, toe-kick height, and backsplash coverage before tiling begins to avoid awkward cuts or misaligned junctions once cabinets are installed.

Explore our Kitchen Cabinets and Wardrobe collections to see factory-direct cabinetry for villa and hotel projects, or contact our team for a project-specific consultation and quote.
Related reading:
Kitchen Island Dimensions: Sizing & Clearance Guide
Kitchen Cabinet Materials in Singapore: Density, Moisture Resistance & What the Test Reports Actually Say 
Best Material for Kitchen Cabinets: Choosing by Budget, Climate & Upkeep 

Let’s Discuss, Your Project.

Tell us about your project requirements and we’ll connect you with the right team. We typically respond within 24 hours on business days.

Call / WhatsApp
Offices
Located on Central Avenue, Nanhai District, Foshan City, Guangdong Province

Start a Conversation

Fill in your details and we’ll be in touch shortly.


Scroll to Top